VM migration from VMware to Proxmox can be necessary whether an organization is diversifying its infrastructure or completely moving its production workloads to a new platform. There are two main methods to migrate virtual machines from VMware ESXi hosts to Proxmox VE hosts: manually and with special tools. This blog post provides a detailed step-by-step tutorial for the successful migration of virtual machines to Proxmox VE using the 2 methods.
NAKIVO for Proxmox Backup Agent-based, app-aware backup for Proxmox VE with multiple targets, including immutable cloud backups. Multiple instant granular recovery and full recovery options. Discover Solution 
Preparation for VM Migration
When planning a migration to Proxmox VE, you should first install Proxmox. Here are a few recommended steps to follow before proceeding with the migration:
- Note down the current network configuration of the source VM and consider setting network adapters to obtain IP configuration via DHCP. This approach can help to avoid messages about IP address conflicts in the guest operating system of the destination VM because new network adapters can be used after migration. After finishing the VM migration, you can restore the network configuration for the attached network adapters.
- Ensure that there is a network connection between the source ESXi host and the destination Proxmox host. The network connection is required for most methods to copy the VM data when migrating from ESXi to Proxmox.
- Disable disk encryption for the original VM on the VMware ESXi host. An enabled vTPM device for a VM can cause migration issues.
- You should import the VM in a powered-off state.
The environment used in this tutorial is:
- VMware virtual environment:
- ESXi 8: 192.168.101.31
- ESXi datastores: datastore40t, datastore50
- Proxmox virtual environment:
- Proxmox host: 192.168.101.226
- Datastores: local-zfs, datastore55
Method 1: Manual Migration
Let’s migrate a Windows Server 2022 virtual machine running on an ESXi host. The idea behind the first VM migration method is to create a new empty Proxmox/KVM VM with identical settings and transfer the virtual disk data from the original ESXi VM to this Proxmox VM.
Checking the original VM
- Enable SSH on the source ESXi host where the original VM is stored. To enable SSH access in VMware Host Client, go to Host > Manage in the Navigator pane, hit the Services tab, select TSM-SSH, and right-click this item. In the context menu, click Start to start the SSH server service immediately. Click Policy > Start and stop with host to start the SSH server service automatically when ESXi boots.

- Check the hardware configuration of the original VMware VM to recreate the VM hardware configuration for the destination VM on the Proxmox server. Select the original VM in the left pane of the web interface of VMware Host Client or VMware vSphere Client and check data in the Hardware Configuration section. You can click Edit VM settings to see more VM configuration parameters.

- Check whether UEFI or BIOS is set up in the VM settings because this setting impacts the guest OS boot. BIOS is selected in the settings of the original VMware VM residing on the ESXi host. This means that we will need to select BIOS in the VM settings of the destination VM on the Proxmox server.
Select a VM, click Edit VM settings, select the VM Options tab in the Edit Settings window, and expand the Boot Options section to check the UEFI/BIOS settings for the VM. In our example, we use BIOS for the original VM.

- Disconnect any CD/DVD images or disks from the original VM.
- You can uninstall VMware Tools before migration or after migration. If you want to preserve the original VM in a fully operational state, it is better to uninstall VMware Tools on the destination VM after migration to a Proxmox server until you are sure that the migrated VM is working properly.
Creating a new Proxmox VM
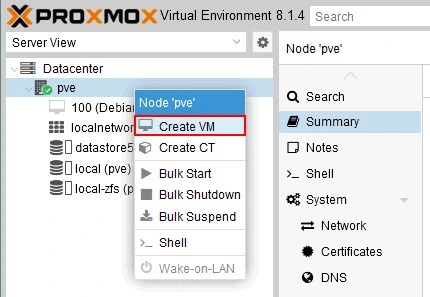
- Create a new VM on the Proxmox server with the same parameters as the original VMware VM on the ESXi host. This applies to CPU, memory, network cards, virtual disks, etc. Right-click the Proxmox host in the left pane of the Proxmox VE web interface and click Create VM.

- In the General tab (step) of the Create: Virtual Machine wizard, enter the following parameters:
- Node: pve
This is the name of our Proxmox host.
- VM ID: 101
You can use any free VM ID. by default, the numbering starts from 100.
- Name: Server2022
You can enter any number, but for more convenience, enter the name that is the same or identical to the name of the original VM on the ESXi host.
Click Next at each step to continue.

- Node: pve
- At the OS step, select the same guest OS that was set for the original VMware VM. In this case, this is Windows Server 2022.

- System. Select BIOS if the original VM uses BIOS or select UEFI if the original VM uses UEFI. Deselect the Add TPM checkbox if you’re not using TPM on the virtual TPM module. You can ignore the SCSI controller settings because we will connect the imported virtual disk manually.

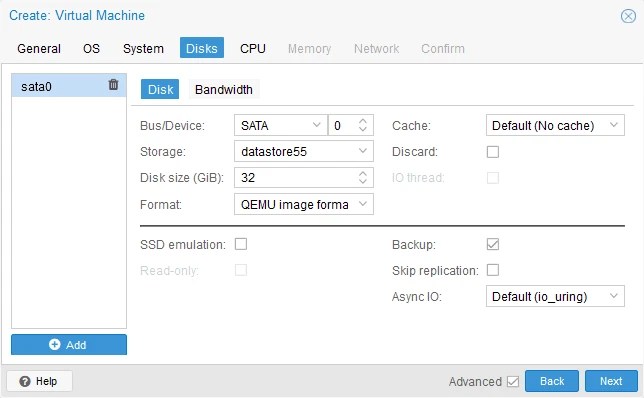
- Disks. By default, a new virtual disk is created when creating a new VM in Proxmox VE. In our example, the path to the virtual disks on the Proxmox datastore is:
/mnt/datastore/datastore55/images/101
We will delete this virtual disk after creating a new VM because we are going to copy and import the virtual disk(s) of the original VM (this can be done in the GUI).

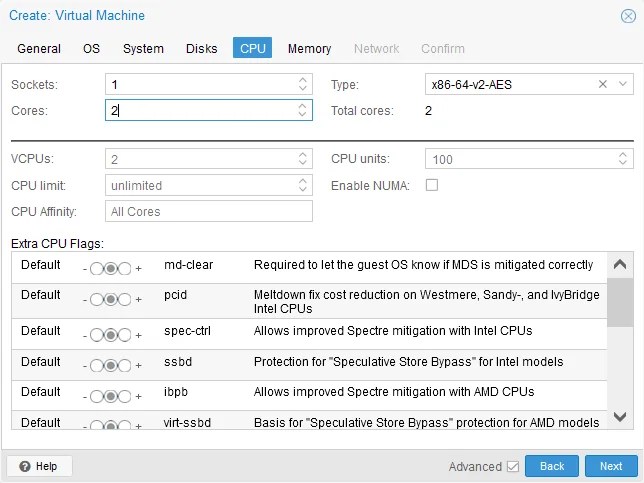
- CPU. Set the CPU settings similar to those on the original VM. In this example, we use one processor with two cores.

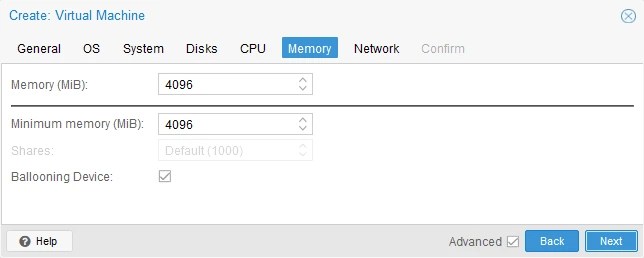
- Memory. Set the amount of memory for the new VM. Set the same amount as it was set for the original VM.

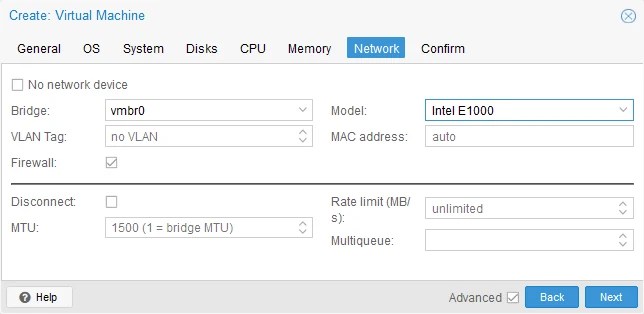
- Network. Select a bridge for the needed network mode (Bridge, NAT, etc.). Select a virtual network adapter model. You should set a network adapter that can be recognized in the guest operating system after VM migration from ESXi to Proxmox. Some virtual network adapters require drivers, and if these drivers are not installed in the guest OS, the network adapter will not work. You can select the most compatible network adapter and change the adapter model to the needed one after finishing VM migration and installing the appropriate drivers and guest tools.

- Select the recently created new VM in the left pane of the Proxmox web interface (Server2022 in this example). Click Hardware, select a virtual hard disk created by default with the new VM and click Detach.

- Are you sure you want to detach entry “Hard Disk (sata0)”?
Click Yes to confirm.
- Click Remove after detaching the virtual hard disk.

The new empty VM has been created and is now ready for transferring the virtual disk data from the original VM.
Copying the virtual disk data
First, you should identify the directory for the destination VM and the directory of the original VM to understand where the original virtual disk is located and where the destination virtual disk should be placed. Then, you can copy virtual disks.
- Open the console of the Proxmox server. In the left pane of the Proxmox VE web interface, select your host (pve in this example) and click the Shell button in the top right corner.

- Go to the directory where VM disks are stored in the console. In our case, the virtual disks of our new Proxmox VM are stored in datastore55 in the /mnt/datastore/datastore55/images/101 directory, where 101 is the ID of the VM.
cd /mnt/datastore/datastore55/images/101In the screenshot below, you can see that the virtual disk of the new VM was deleted in the GUI and is not displayed in the list of files (vm-101-disk-1.qcow2 – 32 GB). If you have selected UEFI and TPM, then two additional virtual disks are created (in our example, we don’t use these two virtual disks because we use BIOS without TPM).

- Connect to the ESXi with a VM datastore where the original VMware VM is stored via SSH:
ssh root@192.168.101.31Where 192.168.101.31 is the IP address of the ESXi host, and root is the username
- Check the files of the source VM in the source VM directory on the appropriate ESXi datastore:
ls -al /vmfs/volumes/datastore50/WinServer2022/Note the names of the .vmdk and –flat.vmdk files of the original VMware VM on the ESXi host. These files are the virtual disk descriptor and raw data file needed to copy for VM migration to Proxmox.
- Exit the SSH session:
exit
- Stop the original VM on the ESXi host.
- Now, copy the vmdk and -flat.vmdk files of the original virtual disks of the original VM by using the SCP client and the SSH connection that we enabled on the source ESXi host. Run the following commands in the Proxmox VE console:
scp root@192.168.101.31://vmfs/volumes/datastore50/WinServer2022/WinServer2022.vmdk .scp root@192.168.101.31://vmfs/volumes/datastore50/WinServer2022/WinServer2022-flat.vmdk .where:
root is the user name on the ESXi host
192.168.101.31 is the IP address of the ESXi host
. means the current directory where we stay now on the Proxmox server (copy the file to the current directory); we can set /mnt/datastore/datastore55/images/101 explicitly instead.
Enter the ESXi root password when prompted.

NOTE: If you select UEFI with TPM instead of BIOS in the VM settings, two small virtual disks can be created for VM boot in the UEFI mode and for the virtual TPM module. Using TPM is not recommended when migrating a VM.
- Rescan all datastores and display the virtual disks that are present on the Proxmox host:
qm rescan - Check the contents of the VM directory used for VM migration:
ls -lAs you can see, the original thin provisioned virtual disk now occupies 30 GB as it is thick provisioned after copying. This is because thin provisioning is a feature of the VMFS file system used by ESXi.
To export thin provisioned vmdk virtual disks to a Proxmox server without consuming the maximum virtual disk size, you can export the original VMware VM to an OVF template. In this case, the size of the exported vmdk virtual disk is equal to the size occupied by files inside the virtual disk(s).
- Export/import of a VM template (alternative)
To export a VM to an OVF template, you can use the GUI of VMware vSphere client (right-click the VM and select Export) or VMware Host Client. Alternatively, you can download the OVF tool from the VMware website to export the VM in the command line.
You can run the following command in the console of the Proxmox server to export a VM from the ESXi host to an OVF template and store the template files on the Proxmox server:
ovftool vi://root@{IP or FQDN of ESXi host}/{VM name} /path/to/export/locationIn our example, the command to create an OVF template and store the template files in the VM directory on the Proxmox host is:
ovftool vi://root@192.168.101.31/WinServer2022 /mnt/datastore/datastore55/images/101The ovftool creates a subdirectory to store the template files.

Proxmox VE supports the VMware vmdk format of virtual disks, which is not the native format for Proxmox VE (KVM/QEMU). The native format is qcow2. You can manually convert a VMware virtual disk to the qcow2 format or raw format. You can also import a virtual disk by converting this virtual disk with a single command. All these commands are explained below.
- Export/import of a VM template (alternative)
- Convert/import a virtual disk to the needed format for the destination VM. Below we cover 4 methods to convert and import a virtual disk below and use the most suitable for you before going to the next stage.
- Converting vmdk to qcow2
To convert a virtual disk of the VMware format (vmdk and –flat.vmdk) to the native Proxmox/KVM format qcow2 use the command:
qemu-img convert -cpf vmdk -O qcow2 <source-file> <output-file>In this example, the command that we execute from the VM directory is:
qemu-img convert -cpf vmdk -O qcow2 ./WinServer2022.vmdk ./WinServer2022.qcow2Check the contents of the directory after converting a virtual disk:
ls -alThe converted qcow2 virtual disk occupies 15 GB of disk space (there are 15 GB of files inside the virtual disk), given that it was thin provisioned. Read more about supported formats in the KVM vs VMware comparison.
You can select this converted qcow2 virtual disk in the Proxmox web interface for the migrated VM. Before doing this, let’s go over the alternative commands for importing a virtual disk and changing the virtual disk format.
- Importing in a raw format
To import a virtual disk in a raw format, we can run this command from the directory of the migrated VM:
qm importdisk 101 ./WinServer2022.qcow2 datastore55Where datastore55 is a datastore on the Proxmox host on which the destination VM (101) is located.
- Importing vmdk directly
You can use the command to import a virtual disk from the vmdk format directly to raw. The command to import VMDK to Proxmox as raw is:
qm importdisk 101 ./WinServer2022.vmdk datastore55 - Importing as qcow2
If you want to use the qcow2 format in the output (not raw) for Proxmox vmdk import, use the command:
qm importdisk 101 /mnt/datastore/datastore55/images/101/WinServer2022.vmdk datastore55 -format qcow2
- Converting vmdk to qcow2
Attaching a virtual disk
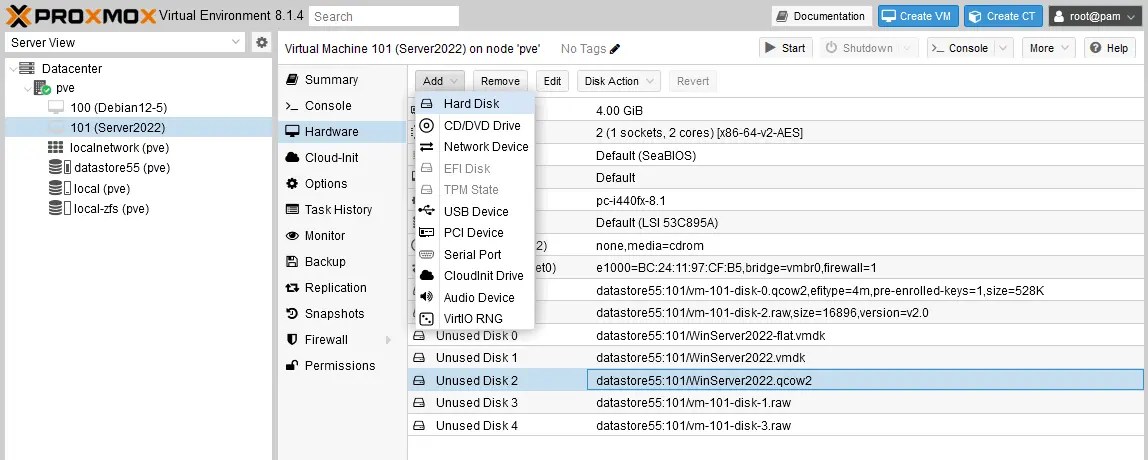
Attach the migrated virtual disk to the Proxmox VM (101), which is now classified as an unused disk. You can do this action in the GUI of Proxmox VE.
- Select the virtual machine you have created for VM migration from VMware ESXi to Proxmox VE (Server2022 in this example). Go to the Hardware section and click Add > Hard disk.

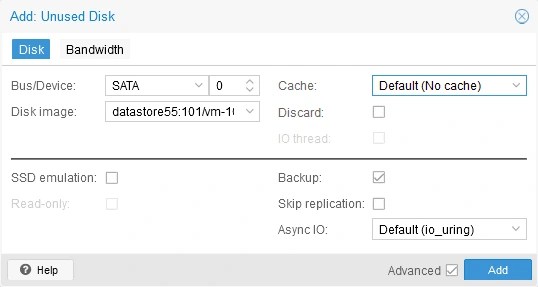
- Ensure that the supported disk controller is selected (using SATA or IDE works in most cases) in the Add Unused Disk options. Hit Add.

- Set the virtual disk added to the VM configuration as the first boot device. Once the VM is selected, go to Options and double-click Boot Order. Select the checkbox in the line of the imported virtual disk and drag this virtual disk to the first position in the boot order list. Hit OK to save the settings.

- Don’t forget that UEFI or BIOS settings must match the ones of the source VM for a proper guest OS boot.
- Start the migrated VM. The VM should boot successfully now. Otherwise, check the boot disk in the boot settings and check the virtual disk controller in the VM settings. To change a virtual disk controller, you need to detach the virtual disk and then reattach it. When attaching a virtual disk, you can select the disk controller options.
Post-migration configuration
Install VirtIO drivers and a QEMU guest agent in the quest OS for optimal VM performance. Linux machines have supported paravirtualized VirtIO drivers since kernel 2.6. Using paravirtualized virtual devices provides higher performance than the emulated ones.
You can download VirtIO drivers from the Proxmox website:
https://pve.proxmox.com/wiki/Paravirtualized_Block_Drivers_for_Windows#Download
https://pve.proxmox.com/wiki/Windows_VirtIO_Drivers
The VirtIO drivers are available in the ISO image file, such as virtio-win-0.1.240.iso
For Windows guests:
- Upload the downloaded ISO image to the Proxmox datastore and mount this ISO image to the migrated VM.
- Browse the contents of the mounted ISO image from the guest OS and run the appropriate installer to install the needed tools.
- After installing VirtIO Guest drivers, you can change the virtual disk controller to VirtIO SCSI.
Additionally, you can install a SPICE client on your machine and enable SPICE for a VM on a Proxmox server for more convenience and a better user experience when connecting to a VM for management.
You can remove unneeded virtual disk files, such as vmdk files, from the Proxmox datastore after the VM migration is finished successfully. Use the commands like these:
rm /mnt/datastore/datastore55/images/101/WinServer2022.vmdk
rm /mnt/datastore/datastore55/images/101/WinServer2022-flat.vmdk
Method 2: Using esxi-import-tools
The second method to migrate VMs from ESXi to Proxmox virtual environment was presented at the end of March 2024 with a new Proxmox VE update. A new pve-esxi-import-tools package is planned for the production release in Proxmox VE 8.2. However, this package has been already included in Proxmox VE starting from version 8.1.10, but only in the test and no-subscription Proxmox software repositories. The new import tool provides a user-friendly wizard for importing VMs from ESXi to Proxmox VE in the web interface.
Upgrading and installing Proxmox packages
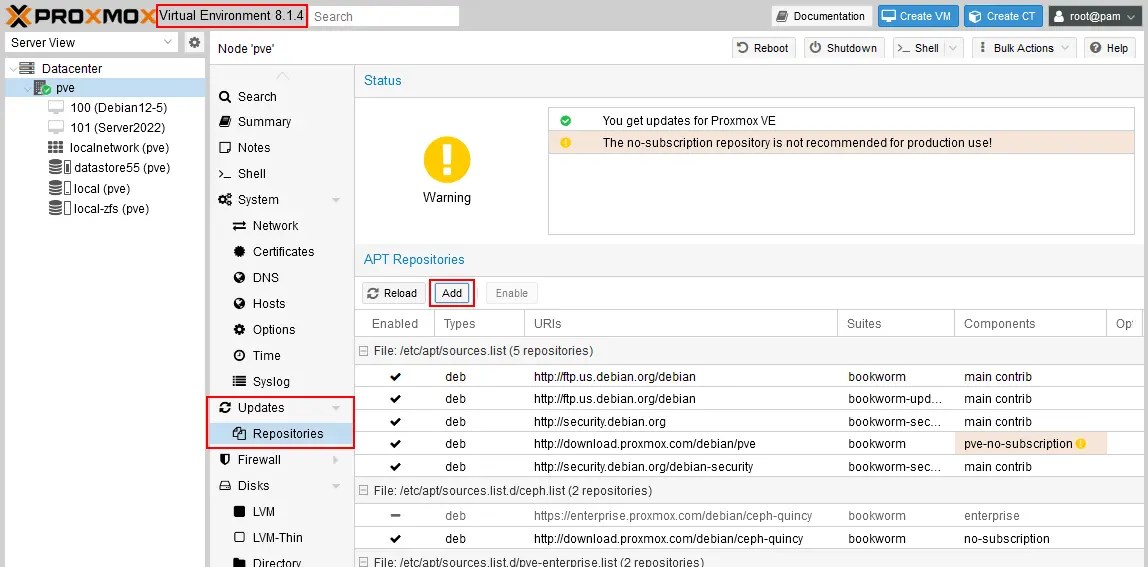
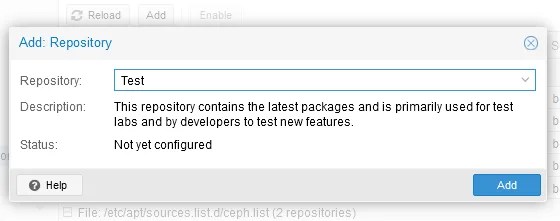
- Add a Non-subscription Proxmox software repository and a Test software repository if they have not been added before. Select a Proxmox host in the left pane (pve in this example). Go to Updates > Repositories and click Add. (By default, only Enterprise repositories are present).

- Select a No-subscription repository in the drop-down menu and hit Add. Then, similarly, select the Test repository.

- Click the Reload button until the added repositories are displayed. As a result, backup repositories have been added and are displayed on the Repositories page.

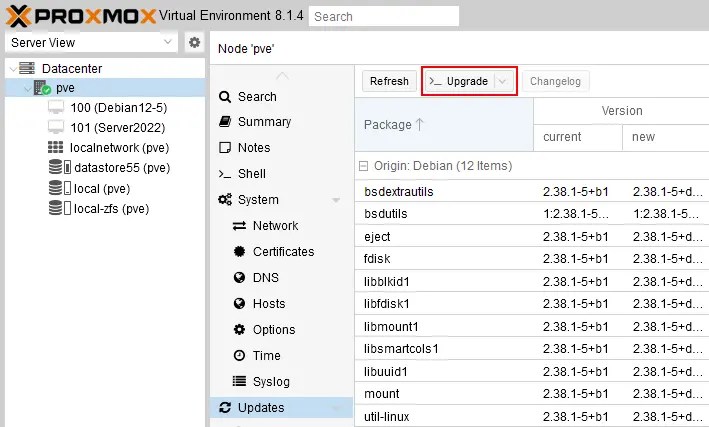
- Go to Updates and hit the Refresh button to refresh the list of available packages to update. You should see the new Proxmox packages in the list.

- A list of packages to update is displayed in a pop-up window. Once the Refresh task is completed, you can close this pop-up window. You are ready to upgrade now.

- Select your Proxmox host in the left pane of the web interface and hit Upgrade.

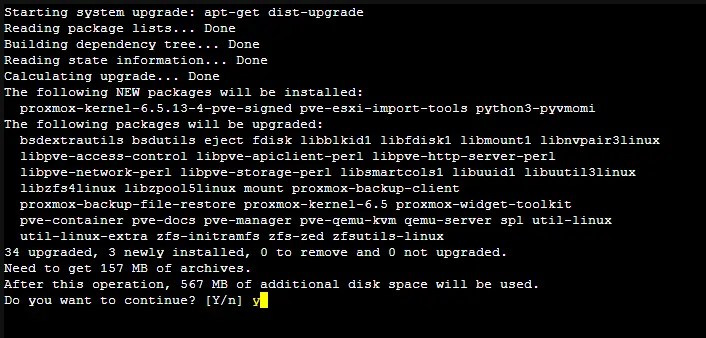
- In the console window that opens, type y and press Enter to start the Proxmox upgrade process. Wait until the upgrade is completed.

- Check whether the ESXi import tool was installed after completing the upgrade.
dpkg -l | grep pve-esxi-import-toolsYou should see the package version in the console output.
- Reboot the Proxmox host to apply the kernel update:
init 6
Configuring Proxmox for VM migration
After the Proxmox host has rebooted, log in to the Proxmox VE web interface. You should see the new version number in the top left corner.
- Go to Datacenter > Storage and hit Add > ESXi to add datastores of an ESXi host with the source VMs to the Proxmox inventory. This action is required to use the VMware to Proxmox migration tool, and the ESXi entry became available after the upgrade.

- Enter the required parameters in the General tab to add ESXi storage:
ID – This is the name of the ESXi storage displayed in the Proxmox inventory. Use letters – don’t use only digits.
Server – Enter the IP address of an ESXi host on which the source VM is residing.
Username – Enter the name of a user with the root privileges on the ESXi host
Password – Enter the password for this user
Nodes – Select a Proxmox host to which the VM migration will be made.
You can skip certificate verification if you didn’t create a certificate.
Click Add.

- ESXi storage has been added and is displayed in the Storage section. Now, we can see the ESXi31 item in the storage list. This item includes all datastores connected to the selected ESXi host. You can double-click this item to see them.

Starting the VM import
- Shut down the source VM on the ESXi host before starting the VMware to Proxmox migration. This action allows you to transfer consistent data and avoid network conflicts if both ESXi and Proxmox hosts are connected to the same network with the bridged mode for VMs. Remove snapshots of the original VM before starting the VM migration process. Note down the network settings of the source VM – you may need them after migration.
- Select the ESXi storage in the left pane of the Proxmox web interface (ESXi31 in this example). Select the vmx file of the original VMware VM that you want to import from the ESXi host to Proxmox VE. We will import Debian12.
Hit Import.

- The Proxmox VM import tool reads the configuration of the source ESXi VM and creates the identical hardware configuration for the new VM. The new VM will include the imported virtual disks on the Proxmox host.
Check the suggested VM configuration and edit some settings if needed in the General tab.

- Don’t select the Live Import option. Live Import is not equal to VM live migration. When this option is selected, a Proxmox host starts the destination VM when it estimates that enough data was transferred to start the guest OS of the VM and continue the VM migration process.
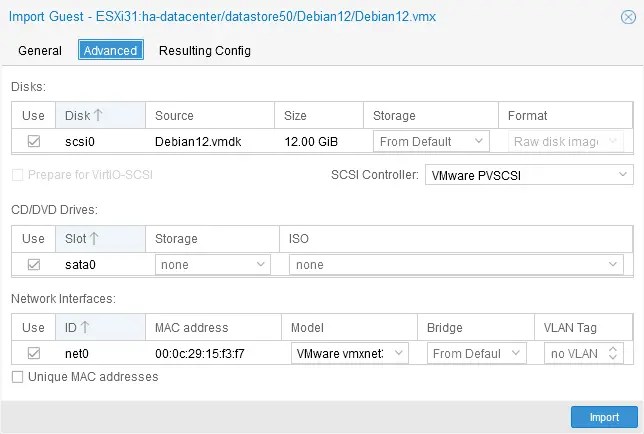
- You can select the Advanced tab and select a virtual disk controller, CD/DVD drive options and options for network interfaces.
Click the Import button to start the VMware to Proxmox VM migration.

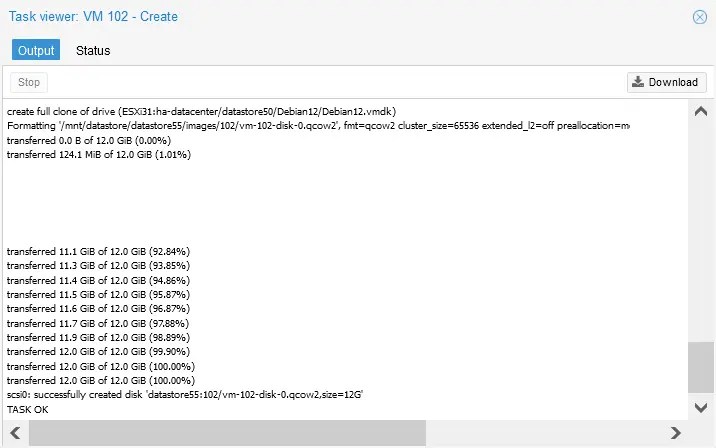
- Wait until the VM migration to the Proxmox host is completed. You can monitor the progress in the pop-up window. You can close this window when done.
As you can see, the original vmdk virtual disk was converted to the native Proxmox QEMU virtual disk format called qcow2 during migration.

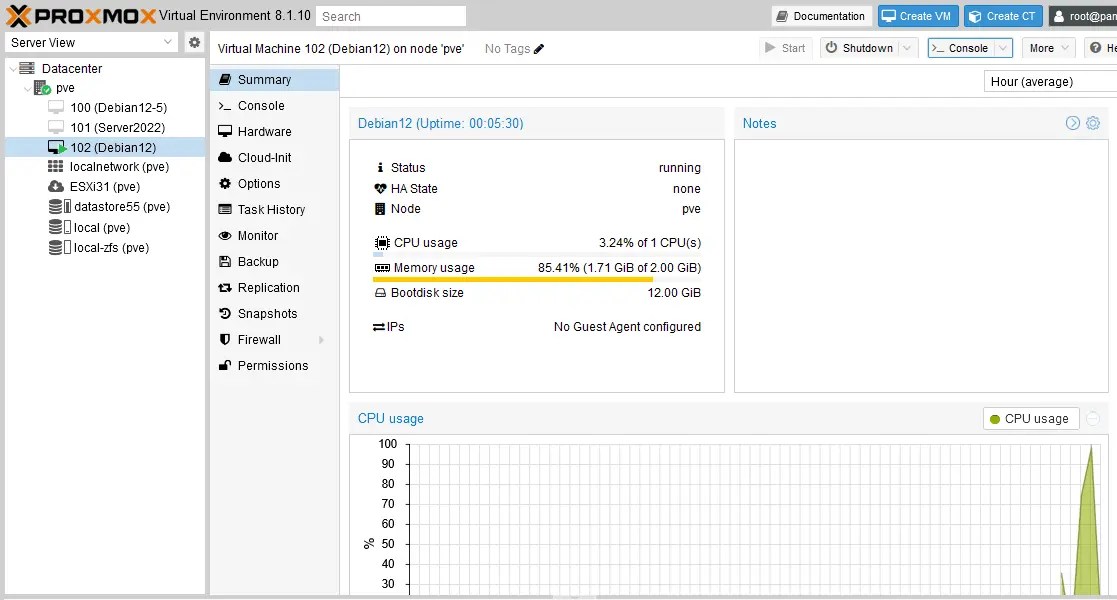
- Start the migrated VM on the Proxmox host.

- Uninstall VMware Tools from the VM that was migrated to Proxmox. Install VirtIO Guest drivers and other needed software on a VM.
Conclusion
VMware to Proxmox VM migration can be performed by creating a new empty VM, copying the virtual disks of the original VM, and importing the virtual disks to the Proxmox VM. Virtual disks can be copied directly or by exporting the original VM to an OVF template. Proxmox has also presented a new tool to import VMs from ESXi hosts in the web interface, that makes the migration process more convenient. Don’t forget to back up VMs once you have migrated them to Proxmox VE.
When running migrations, make sure you have a recent backup of your source VMware VMs and start backing up Proxmox VMs as soon as you start using them for production. NAKIVO Backup & Replication is a universal backup solution that you can use to backup both VMware ESXi and Proxmox VE VMs.
Try NAKIVO Backup & Replication Get a free trial to explore all the solution’s data protection capabilities. 15 days for free. Zero feature or capacity limitations. No credit card required. Try for Free 


